Introduction
- Theme Version: 1.0.0
- Created: Nov 05 2023
Thank you for purchasing our theme. In this document, we provide all kinds of good information with all the details you need to use our theme. We hope you have fun and enjoy working with our theme. If you need more help, please feel free to open a ticket on our support center.
Before Getting Started
If you are not familiar with WordPress, please get accustomed with it before proceeding to using our theme. Here are some links that will help you to become more confident with WordPress:
- First Steps with WordPress: https://wordpress.org/support/article/first-steps-with-wordpress-classic/
- WordPress Optimization: https://wordpress.org/support/article/optimization/
Requirements & Compatibility
Requirements
To run WordPress your host just needs a couple of things:
- PHP version 7.3 or greater
- MySQL version 5.6 or greater
Compatibility
Our theme is compatible with the following browsers:
- Chrome
- Firefox
- Safari
- Microsoft Edge
Installation
WordPress Core
You download and install WordPress version 5.4 or later
Theme Package
To download, you need to log into your ThemeForest account and go to your http://themeforest.net/downloads page. Locate the theme that you purchased in your Downloads list and click on the Download button

- All files & documentation: contains documentation, licenses, theme package and child theme package. So if you select this option, you need to extract the downloaded package and install the theme package inside.
- Installation WordPress file only: contains only the theme package
- License certificate & purchase code (PDF): contains your license information in a PDF file
- License certificate & purchase code (text): contains your license information in a text file
WordPress Installation
Follow the steps below to install via WordPress:
- In your WordPress Admin Panel, go to Appearance > Themes
- Click on the Add New and Upload Theme buttons
- Click on the Choose File button and navigate to find the monic.zip file on your computer and click on the Install Now button
- Wait while the theme is uploaded and installed
- Activate the newly installed theme
- Then you will get a notification about installing the required plugins. Follow the steps to install and activate the plugins

- Some hostings have a restriction on a size of a file that you are uploading. If you have any warning, you will contact your hosting provider. They should increase your maximum upload size.
- If you get the error message: "The package could not be installed. The theme is missing the style.css stylesheet.", it means that you didn't upload the theme package. You will need to extract your package and install the monic.zip file inside.
FTP Installation
Follow the steps below to install via FTP:
- Log into your hosting space via a FTP software
- Unzip the monic.zip file and ONLY use the extracted monic folder
- Upload the extracted monic folder into wp-content > themes folder
- Go to Appearance > Themes and activate the Druco theme
- Then you will get a notification about installing the required plugins. Follow the steps to install and activate the plugins

Required Plugins
After activating the theme, you will get a notification about installing the required plugins. You go to Appearance > Install Plugins to install them.

Demo Content
Our theme includes the demo data to the One Click Demo Import plugin. In admin panel, you go to Appearance > Demo Importer (You have to install and activate the Monic Plugin to see this menu item). Then you click on the Import Demo Data button and the Continue & Import button (without selecting any recommended plugin from One Click Demo Import). It will take a few minutes to complete!

Please note that if you have any problem with import, please read this article https://ocdi.com/import-issues/ and check your hosting configuration, or contact us here support@themerange.net
Updating The Theme
Manual Update
Follow the steps below to manually update the theme:
- First, you download the new theme package from themeforest. You have to log into your themeforest account and navigate to the Downloads tab. You find the Monic theme in your purchased themes list.
- You delete the current theme. Don't worry about this. Your data won't be lost.
- You upload the new theme package via WordPress or FTP software.
Automatic Update
You update the theme through the Envato Market plugin. Follow the steps below to set up this plugin:
- Download and install the Envato Market plugin
- You go to here https://build.envato.com/create-token/ and create a token. Get it.
- In WordPress admin panel, you find the section called Envato Market. You enter your token code in there.
- If you translated the theme to another language, you should backup your translation files in the themes > monic > languages folder before updating. You should also backup the translation files in plugins.
- After updating the theme, you should update the recommended plugins if there is a notification about updating plugins. You go to Appearance > Install Plugins to update plugins. If you can not update the recommended plugins in wp admin, you should manually update them.
Theme Options
After activating our theme, you can go to Appearance > Theme Options to configure the theme. Below will explain what you can do with Theme Options.
- General: Add your logo and some global options
- Header: set up the Header Layout, breadcrumb and other options for header
- Header: select Header Builder which you want to show
- Footer: select Footer Builder which you want to show
- Blog: configure the Blog Layout and some options to Show/Hide some things on the blog page
- CPT: Custom Post Type (Services, Projects, Team & Testimonials) configure the Layout and some options to Show/Hide some things on the blog page
- Custom Code: allow you to add custom css/js code
- Import/Export: backup or restore your theme options

Header
The header is probably one of the first thing that you will want to setup. It includes the logo, favicon, menu and other things. The following sections will explain how to set up and customize header.
Adding The Logo & Favicon
Follow the steps below to set up the logo & favicon:
- Navigate to Appearance > Theme Options. You select the Logo tab
- Find the logo and favicon options
- Click on the Upload button and choose a file from your library

Setting Up Header
To set up your header, you go to Appearance > Theme Options > Header tab. In there, you can choose Header Layout, configure your breadcrumb and other options.
Header Layout
Monic comes with 6 different header layouts. Just choose one of our header layouts for your site.
You can also choose the header layout for individual pages (see Page Options).

Breadcrumb
Monic comes with 3 different breadcrumb layouts. Just choose one of our breadcrumb layouts for your site.
You can also choose the breadcrumb layout for individual pages (see Page Options).

Other Options
- Sticky Header: Show header when scrolling down.
- RTL: show your site Right to Left direction like Arabic.
- Right Click: Disable your right click of your site.
- Back to Top: Disable back to top separately desktop and mobile version.
- Loading Screen: Disable loading screen or choose your own preload image.
- Top Bar: Disable top bar.
- Search Layouts: 2 Search Layout designs.
- Header Sidebar Disable header sidebar information.
- Search Bar: Show the search bar
- Mobile App Style Navigation: Add style navigation for mobile app
Header
Monic allows you to create unlimited header layouts. The following sections will explain how to set up a new header.
Adding Header Content
Follow the steps below to add a new header content:
- In admin panel, you go to Header Builder.
- Add a new header builder and add content as you normally do with page.
- Then, you go to Appearance > Theme Options > Header. You select your header block in there.


- You have to activate our Monic plugin to see the Header Builder menu.
- If the Elementor editor does not show up, you will go to Elementor > Settings. You check Header Builder in the Post Types option.
Pages
Monic is built based on the Elementor plugin and powerful Page Options which help you build any kinds of pages. The following sections will explain how to create a new page.
Create A New Page
Follow the steps below to create a new page:
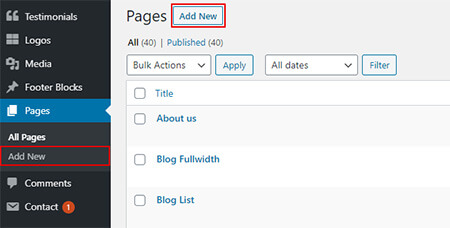
- In admin panel, go to Pages and click on the Add New button
- Input the page title and page content
- On the Page Attributes section, choose the page template from dropdown list
- Scroll down and find the Page Options section, make some configurations for your page
Page Options
In the page editor (You Edit Page, not Edit with Elementor), you will see the Page Options section at the bottom of editor. It will help you create many kinds of pages.
After changing Page Options, you can switch to Elementor and continue editing page content.

Some options will override the options in Theme Options. Select Default if you want to use your global settings.
- Layout Fullwidth: enable Fullwidth for your page layout. You can set Fullwidth for the whole page or part of page (Header, Main Content, Footer)
- Page Layout: select Fullwidth, Left Sidebar, Right Sidebar or Left & Right Sidebar
- Left Sidebar: select a sidebar to display on the left sidebar
- Right Sidebar: select a sidebar to display on the right sidebar
- Footer Builder: select a header builder to replace the header builder which is selected in Theme Options
- Show Page Title: show or hide the page title. The page title is hidden on home page by default
- Show Breadcrumb: show or hide the breadcrumb. It is also hidden on home page by default
- Breadcrumb Layout: select a layout for your breadcrumb
- Breadcrumb Background Parallax: allow you to apply parallax in the breadcrumb background
- Breadcrumb Background Image: change the breadcrumb background image for this page
- Footer Builder: select a footer builder to replace the footer builder which is selected in Theme Options
Home Pages
Setting up a home page
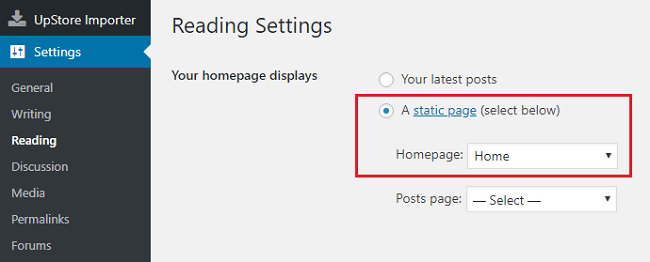
- In admin panel, you go to Settings > Reading.
- You choose the A static page(select below) option.
- Select a page from dropdown list of the Homepage option.
Blog
Monic supports blog post. They will help you easily make a microblogging website.
Create A New Post
Follow the steps below to create a new post:
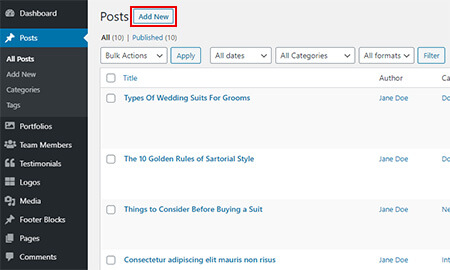
- Go to Posts
- Click on the Add New button
- Input the post title and post content
- Choose the post format and category on the right hand side
- Scroll down and find the Post Options section, make some configurations for your post
Post Options
In the post editor, you will see the Post Options section at the bottom of editor. It will help you create different layouts for different posts.

Blog Page
Follow the steps below to set up a Blog page:
- You create a new page
- Input the page title. You don't need to input the content
- On the Page Attributes section, set Tempate to Blog Template
- Save your page
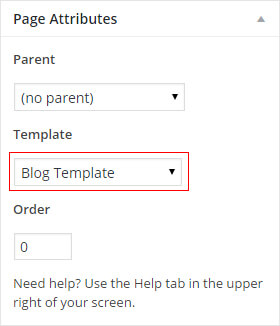
- If you use Blog Template, you will configure your blog layout in the Page Options section.
- If your homepage displays the latest posts (setup in Settings > Reading), you will configure your blog layout in Theme Options > Blog tab.
Elementor
Elementor will help you manage your content at the WordPress sites and build any layout you can imagine in a few minutes without coding. You can watch tutorial video to get started.
How to add new element
To use Elementor, you click the Edit with Elementor button

It will change to the Elementor editor as below

Then, you choose an element, drag and drop it from the left panel to the right panel

TR Elements
All our elements are in the TR Elements section (with the TR prefix). Below explains about them.
- TR Slider: display slider in 3 layouts.
- TR Price Table: display price table in 2 layouts.
- TR Testimonial: display testimonials in carousel slider layout. Go to Testimonials to add new testimonial.
- TR Gallery: display your gallery in carousel layout. Go to Projects to add new gallery.
- TR News: display your blogs in a grid, slider layout
- TR Facts Counter: display your facts counter.
- TR Partners: display your clients/partners logos.
- TR Carousel: display your carousel for services
- TR FAQ's: display your FAQ's
- TR CTA: display your call to action.
- TR Team: display your team member. Go to Team to add new member.
- TR Button: display your button
- TR Contact Info: display your contact informatoin.
- TR Countdown: display your count down timer.
- TR Form: display your contact form
- TR Google Map: display your google map with iframe.
- TR Heading: display your title and subtitle.
- TR Icon: display your icon in flaticon and svg.
- TR Icon Box V1: display your content box.
- TR Icon Box V2: display your contact box in repeater.
- TR Icon List: display your list with icons.
- TR Image: display your image.
- TR Listing: display your listing.
- TR Newsletter: display your newsletter
- TR Social Icons: display your social media
- TR Text: display your content
- TR Video: display your video.
Contact Form 7
Merit makes it possible to create forms for various purposes with the help of Contact Form 7.
In order to setup Contact Form 7, please perform the following steps:
- Go to Contact > Add New from the admin panel.
- Enter a title for your project item in the text field near the top.
- Then create a form for your theme.
- Once you've complete the form click the "Publish" button.
Now when you use Elementor Builder, you will see a new shortcode in the list of Merit tab - Contact specific shortcode.
Support
Please remember you have purchased a very affordable theme and you have not paid for a full-time web design agency. Occasionally we will help with small tweaks, but these requests will be put on a lower priority due to their nature. Support is also 100% optional and we provide it for your connivence, so please be patient, polite and respectful. Please visit our support forum or ask question support@themerange.net
Support for my items includes:
- Responding to questions or problems regarding the item and its features
- Fixing bugs and reported issues
- Providing updates to ensure compatibility with new software versions
Item support does not include:
- Customization and installation services
- Support for third party software and plug-ins
Before seeking support, please...
- Make sure your question is a valid Theme Issue and not a customization request.
- Make sure you have read through the documentation and any related video guides before asking support on how to accomplish a task.
- Make sure to double check the theme FAQs.
- Try disabling any active plugins to make sure there isn't a conflict with a plugin. And if there is this way you can let us know.
- If you have customized your theme and now have an issue, back-track to make sure you didn't make a mistake. If you have made changes and can't find the issue, please provide us with your changelog.
- Almost 80% of the time we find that the solution to people's issues can be solved with a simple "Google Search". You might want to try that before seeking support. You might be able to fix the issue yourself much quicker than we can respond to your request.
- Make sure to state the name of the theme you are having issues with when requesting support via ThemeForest.
Once again, thank you so much for purchasing this theme. As I said at the beginning, I'd be glad to help you if you have any questions relating to this theme. No guarantees, but I'll do my best to assist. If you have any queries, please feel free to contact us at Support Center. Email Us at: support@themerange.net
